Inspection status and automatic narratives
The Inspection status is a structural element of each sub-section. It drives the sub-section’s behavior in the report and, in some cases, triggers automatic findings. This page describes the 4 statuses, why some are protected, and each option’s advanced panel.
The Inspection status card
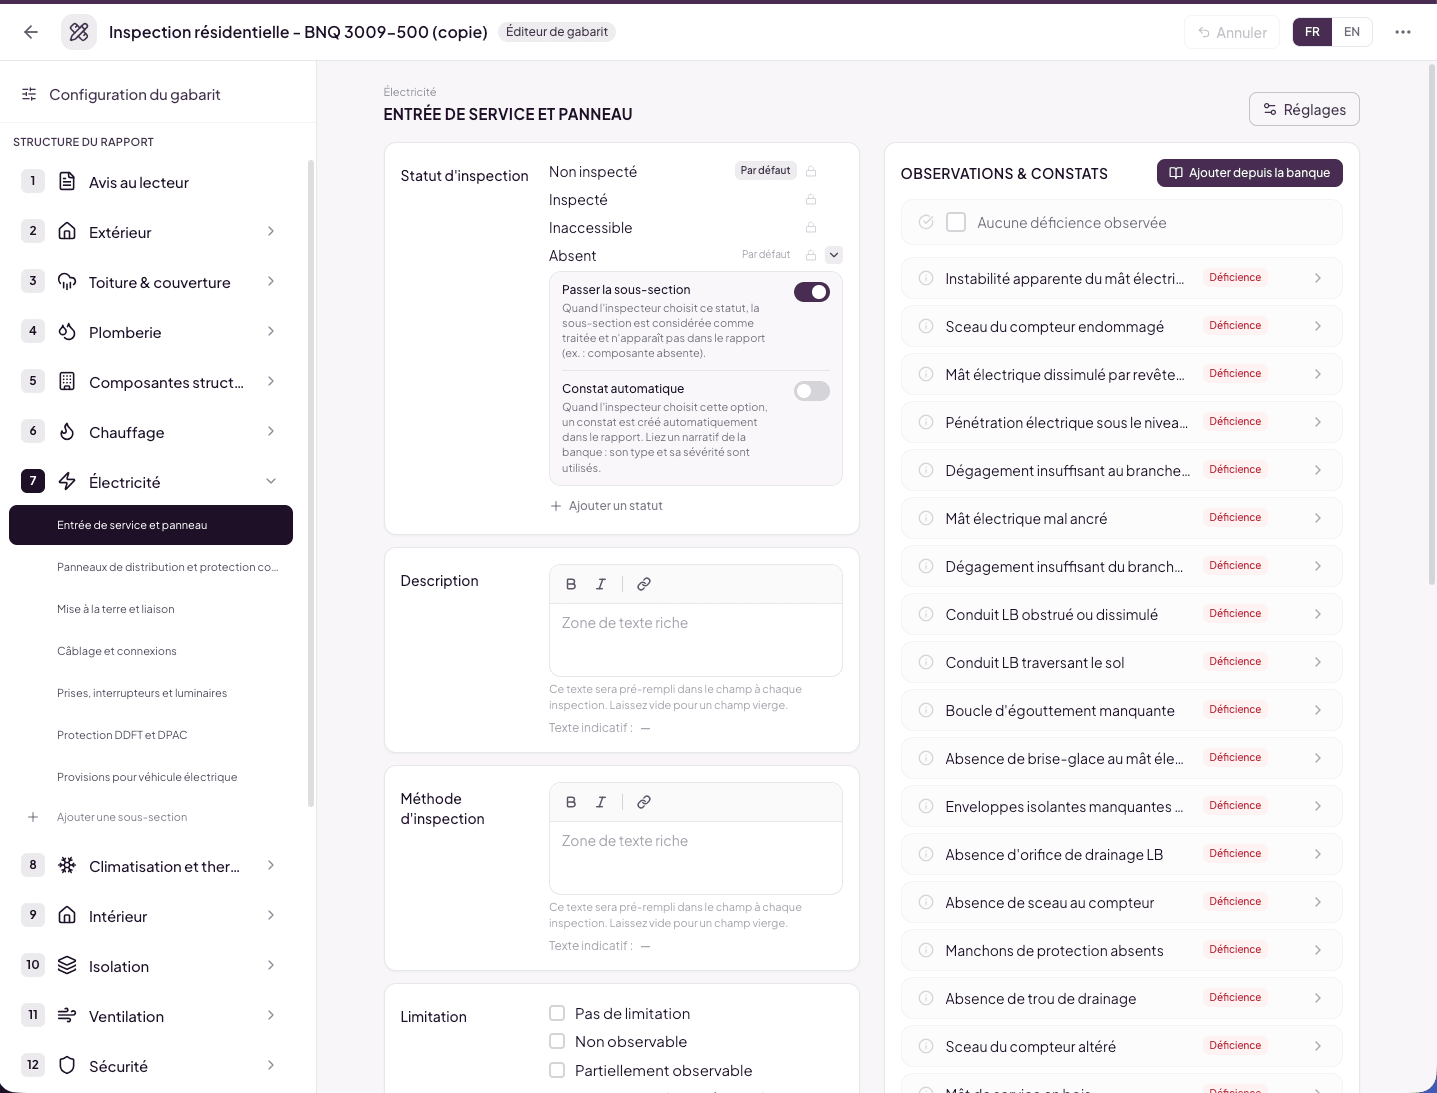
At the top of a sub-section, the Inspection status card lists the statuses the inspector will be able to choose. For each option:
- Click the label to rename it in place (in the language of the FR/EN switch).
- The Default badge marks the initial status of a new inspection. Hover another option to transfer that role — it’s exclusive.
- The lock marks a protected option (see below).
- The chevron > opens the option’s advanced panel.
- The orange lightning bolt ⚡ signals that an option has a configured behavior (skip or automatic finding).
The + Add a status button creates your own extra options.
The 4 default statuses
| Status (FR) | Status (EN) | When to use |
|---|---|---|
| Non inspecté | Not Inspected | The inspector hasn’t inspected this component yet (initial state). |
| Inspecté | Inspected | The component was inspected. Expected final state for most sub-sections. |
| Inaccessible | Inaccessible | The component exists but couldn’t be inspected (furniture, blocked access, weather). |
| Absent | Not Present | The component doesn’t exist on this property (e.g. a fireplace on a house without one). |
Why these statuses are protected
Each default status carries a lock: you can rename it, but not delete it. The lock’s tooltip sums it up: “System status used by the report engine: you can rename it, but not delete it.”
The reason: these statuses are tied to fundamental report behaviors. For example:
- If the inspector activates a finding in a sub-section, the status automatically switches to Inspected.
- If the status is Not Present, the sub-section is hidden from the generated report (via its “Skip the sub-section” option, see below).
If you could delete Not Present, the whole hiding mechanism would stop working. Lumos therefore protects the mechanics while letting you customize the presentation (for example renaming “Inaccessible” to “Not observable”).
An option’s advanced panel
The chevron > on an option opens its advanced panel, with two configurable behaviors:
Skip the sub-section
“When the inspector picks this status, the sub-section is considered handled and doesn’t appear in the report (e.g.: component not present).”
This is the setting that keeps a Not Present component from cluttering the report. Enabled by default on the BNQ template’s Not Present status.
Automatic finding
“When the inspector picks this option, a finding is automatically created in the report. Link a narrative from the bank: its type and severity are used.”
Turn on the toggle then pick the narrative from the Narrative Bank. The chosen narrative shows in the panel with its type and severity.
Concrete example
A Roofing sub-section with the Inaccessible status configured with an automatic finding linked to a Limitation-type narrative — “The inspector could not climb onto the roof due to weather conditions. A visual inspection from the ground and with a rangefinder was performed. A new inspection is recommended in dry weather.”
When the inspector selects Inaccessible in the field, the finding is automatically added to the sub-section. They can adjust it afterwards, but the skeleton is already in place.
The ⚡ indicator
In the Status card (and on inspection element options, see RT.7), an orange lightning bolt next to an option means at least one behavior is active on it — skip or automatic finding. Opening the advanced panel shows the details. It’s the fastest way to spot, in a busy template, where the automations are.
Automatic findings beyond the Status
The Automatic finding mechanism also exists on the options of other inspection elements (checkboxes, dropdowns). See RT.7. The principle is the same: checking an option makes a pre-written finding appear.
Typical example on a Limitation element of type Checkboxes (Multiple):
- Option Partially observable with an automatic finding → when the inspector checks this box, a Limitation-type finding is inserted: “The component was partially observable at the time of inspection. Hidden elements could not be evaluated.”
This mechanism is what turns the template into a smart assistant: the inspector makes simple choices (checking boxes, selecting a status), and Lumos pre-fills the relevant narratives.
Adding custom statuses
The + Add a status button creates your own options. These custom options:
- Are fully editable (renamable and deletable — no lock).
- Can have their own automatic finding and even their own Skip the sub-section rule.
Use case: a Partially verified status distinct from Inspected, with a Limitation-type automatic finding.
See also
- RT.7 Inspection elements — the same advanced panel on element options
- RT.8 Narrative configuration — global findings management per sub-section
- Chapter 7 — The inspection editor — how these statuses appear on the inspector’s side