Create and edit a narrative
The narrative is the basic unit of the inspection report. Every observation you document becomes a narrative, attached to a specific building subsection. Lumos offers four ways to create one, and a four-part structure compliant with the BNQ 3009-500 standard.
Fundamental rule: a narrative always belongs to a subsection
A narrative does not exist in isolation in Lumos: it is always attached to a building subsection (for example Roofing & Cover > Roof Cladding, or Structure > Foundation). It is this attachment that determines its position in the final report.
This rule simplifies writing: you do not have to classify your narratives after the fact, they fall into place as you create them.
The four ways to create a narrative
1. From the pre-shown list of a subsection
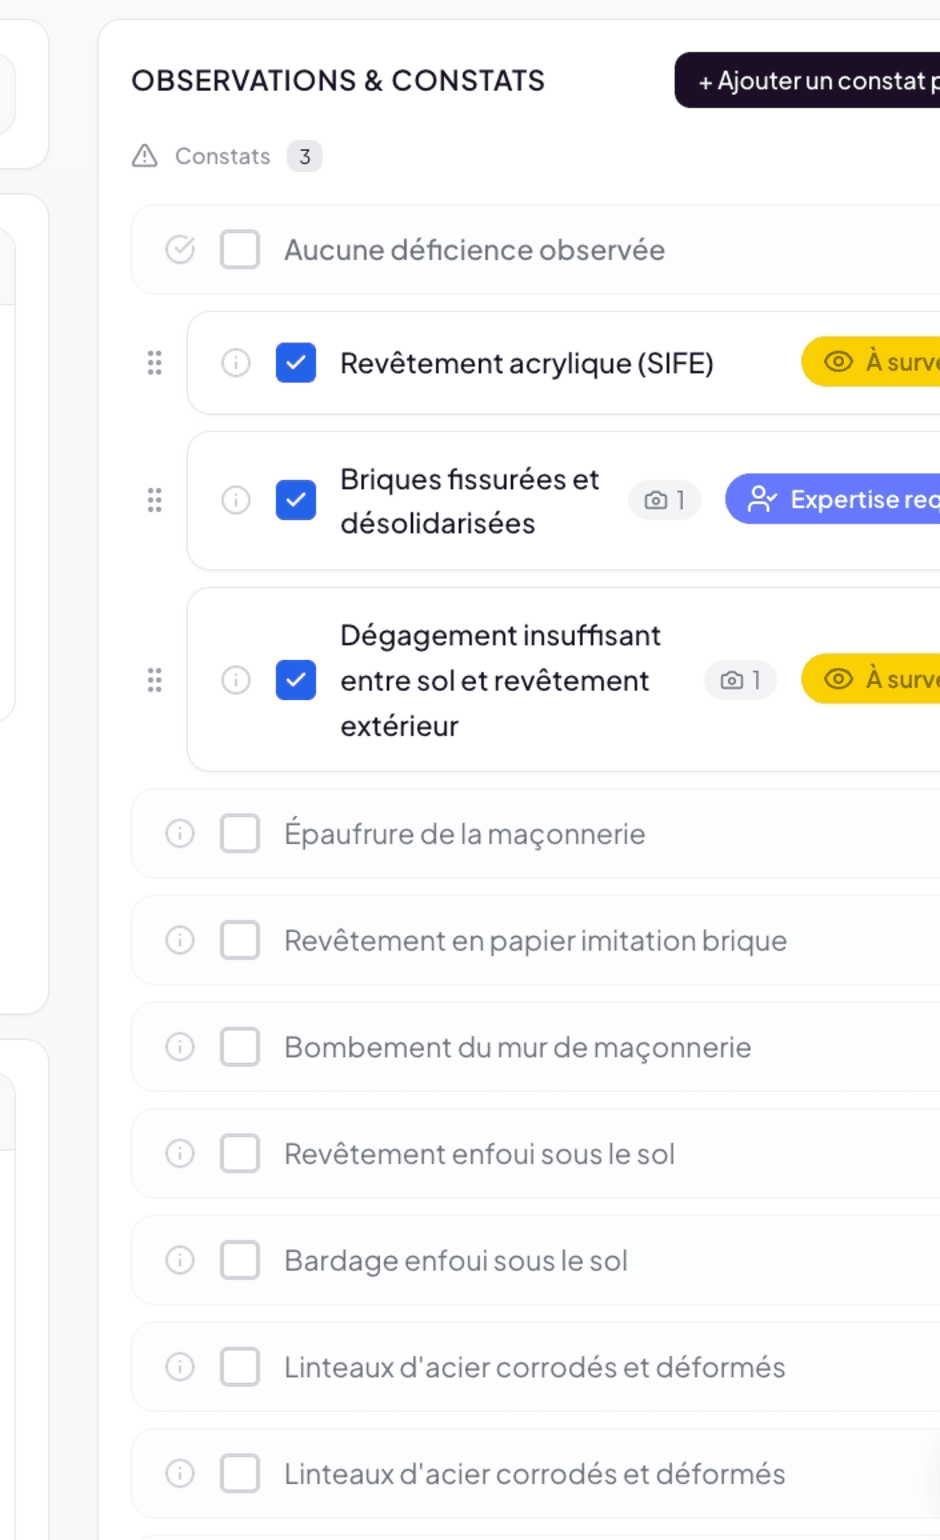
This is the most common method. When you open a subsection in the editor, Lumos shows the list of pre-formulated narratives from the bank, applicable to that subsection. Click the one matching your observation to add it to your report immediately.
You can then adjust it (text, severity, attached photos) or leave it as-is.
2. Manually with “Add a custom narrative”
For an observation that matches no pre-formulated narrative, the Add a custom narrative button in the subsection opens the Add a narrative modal we describe in detail below.
You can:
- Write entirely by hand.
- Ask AI to generate the full narrative from a short description you write.
- Search the bank from the modal, to start from an existing narrative and adapt it.
If you write a custom narrative you might reuse, save it in your bank to reuse in future inspections. See Create a custom narrative.
3. From a capture (field or floating button)
When you capture a photo or a voice note from Lumos Capture on the field, or via the yellow floating (+) button in the web editor, the capture lands in To Review. From this inbox, you turn the capture into a narrative by assigning a subsection, adjusting the text (from the dictation, where applicable), and validating. See To Review and The floating (+) button.
4. From the photo gallery
If you have several photos illustrating the same observation, the photo gallery lets you select them together and create a narrative from the selection. The narrative inherits the selected photos, and you assign it a subsection and a text. See The photo gallery.
The “Add a narrative” modal
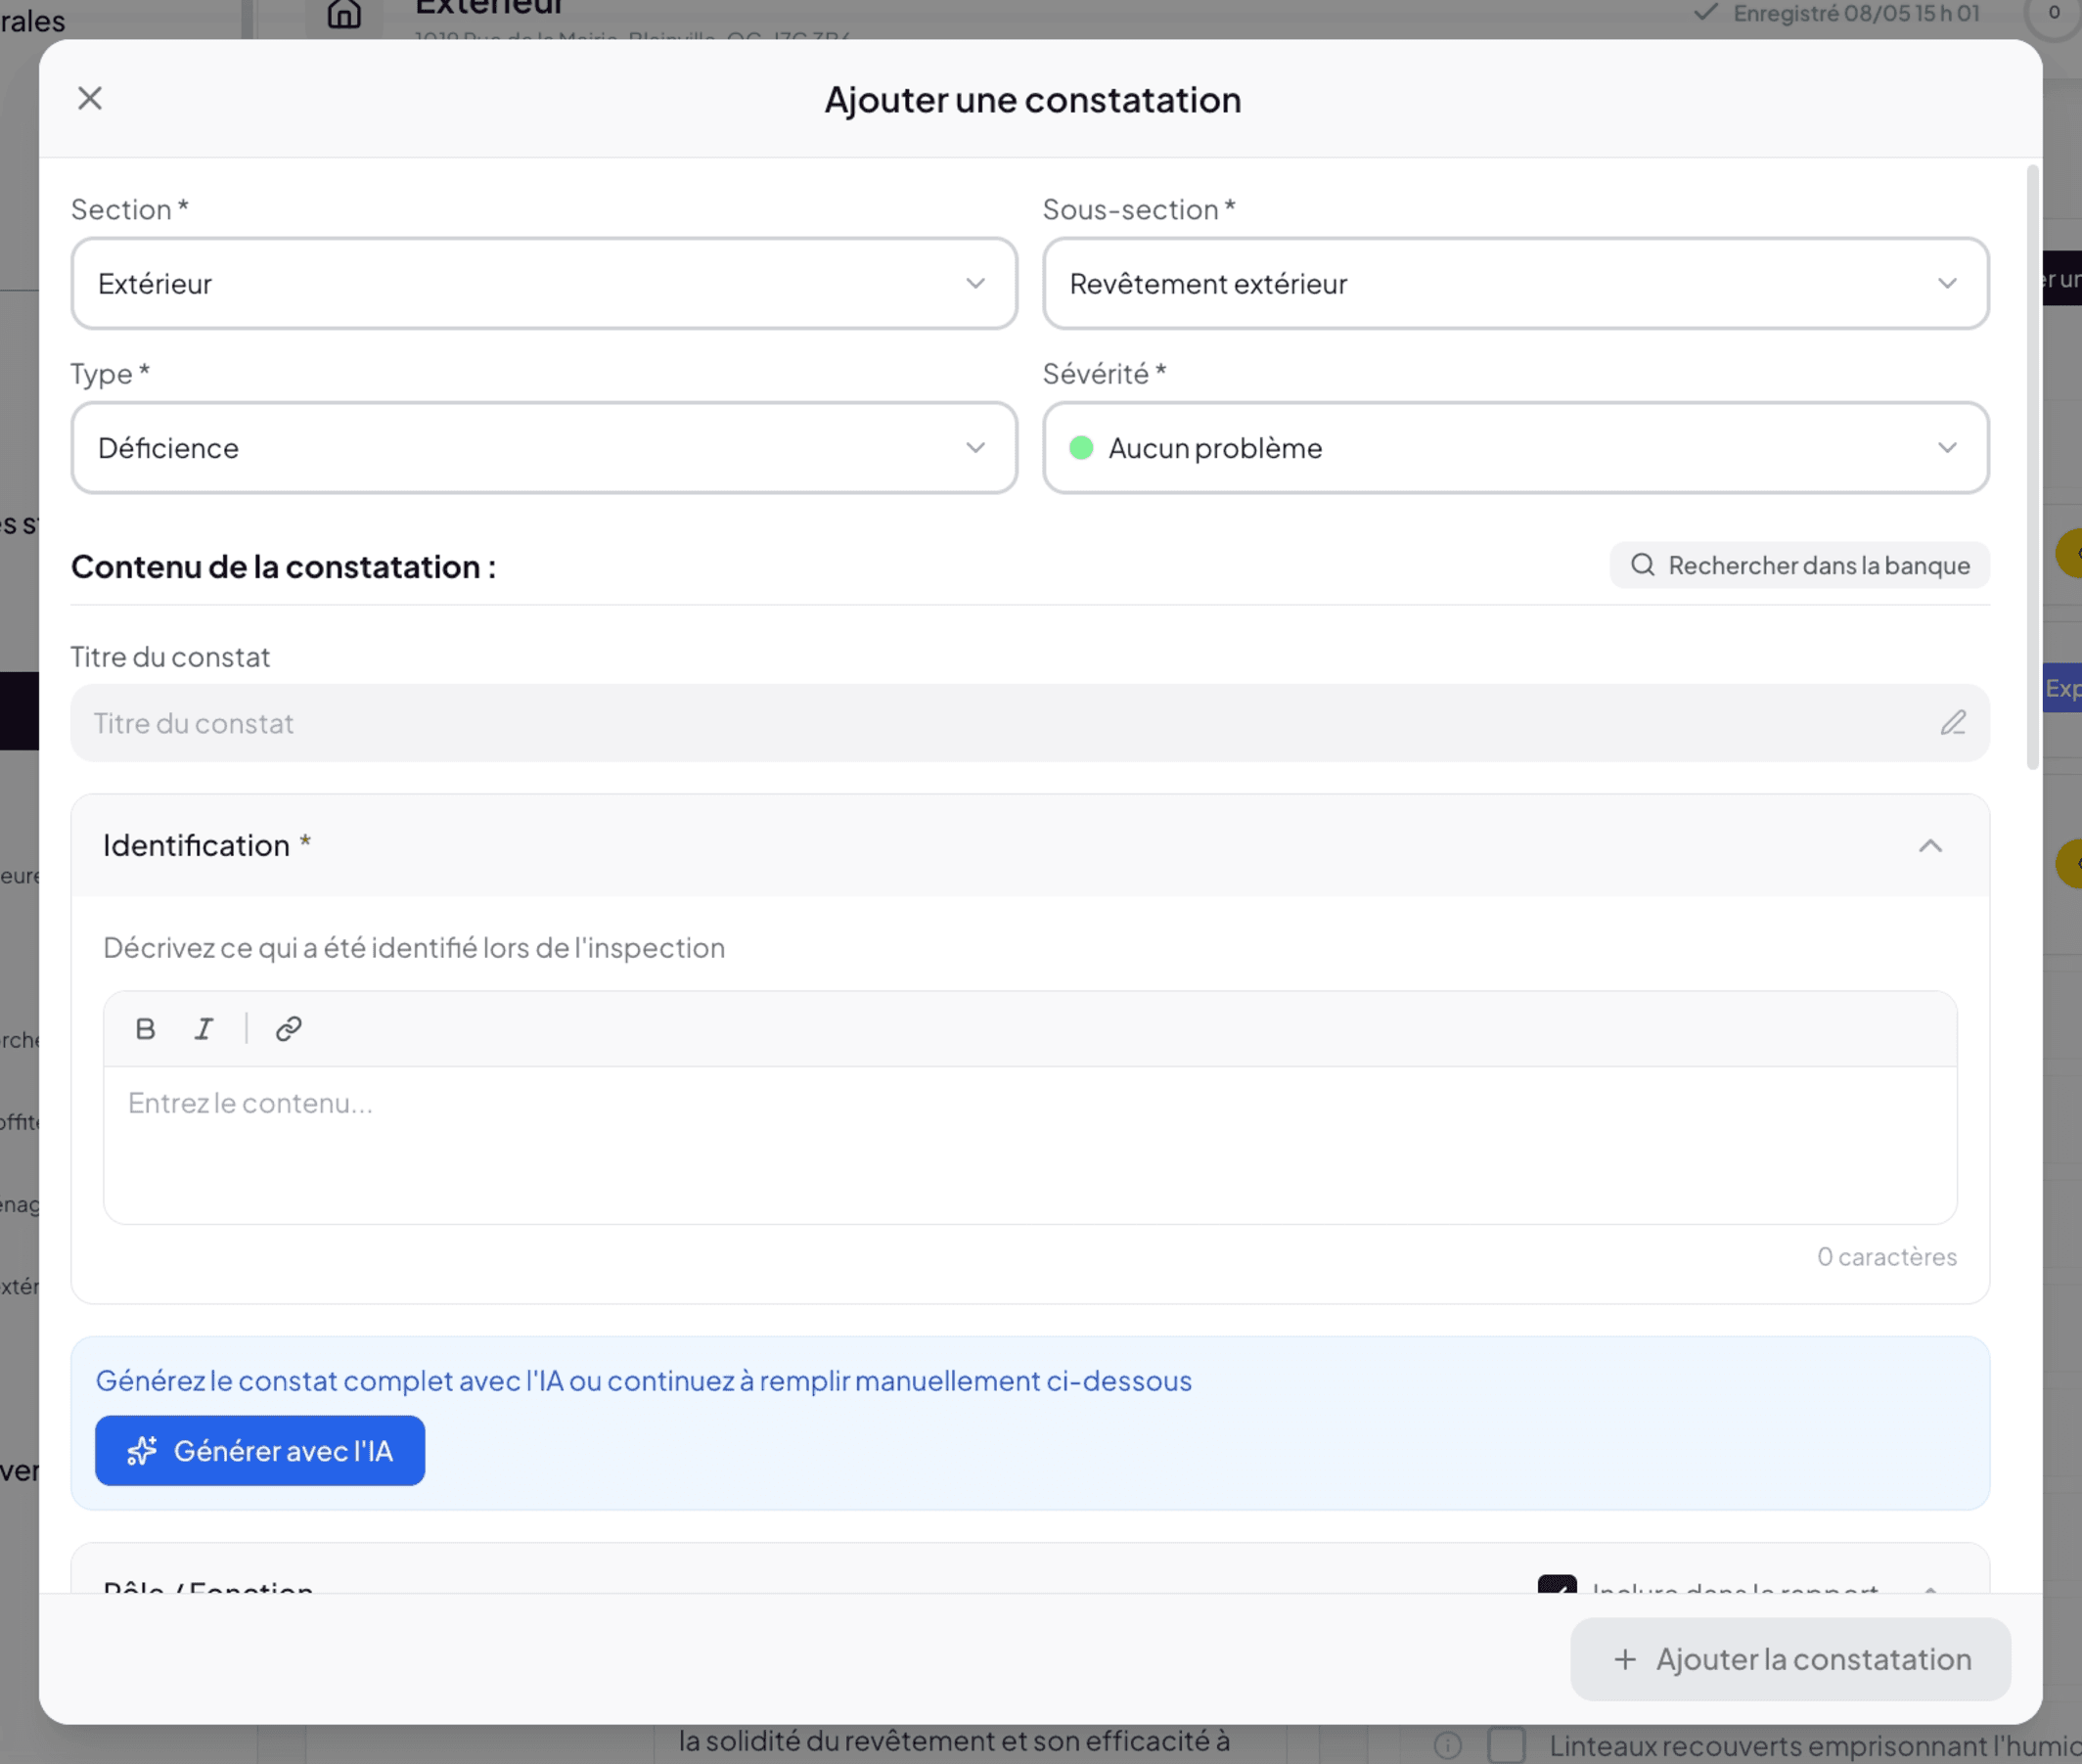
When you create a custom narrative (method 2), Lumos opens a modal structured in two parts.
Modal header
Four fields at the top:
- Section required — the building section. Pre-filled from context (for example Roofing & Cover if you were in that section).
- Subsection required — the specific subsection (for example Roof Cladding).
- Type required — Deficiency, Information, Limitation, or Method. See The four narrative types.
- Severity required — chosen from the levels configured by your template. The default BNQ template provides 7 levels: No problem, Monitor, Warning, Deficiency, Urgent, Specialist Required, Hazard. No problem is selected by default. If you have customized your template, your severities may differ (names, colors, order).
To the right of the narrative title, a Search the bank button opens the bank to start from an existing narrative if you wish.
Narrative title
A short label summarizing the observation. Appears at the top of the narrative in the report.
Narrative body — the four-part BNQ structure
The modal offers four collapsible panels following the structure recommended by BNQ 3009-500 for a residential inspection report. Each panel has an Include in the report toggle to enable or disable its presence in the final deliverable.
1. Identification required
“Describe what was identified during the inspection.”
This is the factual observation: what you observed visually, without interpretation. It is the only required part; the other three are optional depending on the narrative type.
Rich text editor with bold, italic, and link.
2. Role / Function
“Explain the role or function of the component.”
To help your client understand what the component does. Particularly useful for clients not familiar with the technical elements of a building.
3. Consequences
“Describe potential consequences if not addressed.”
The predictable impact of the defect if not corrected. This part helps your client prioritize their interventions.
4. Recommendation
“Provide recommendations to resolve the problem.”
What you suggest as next steps: correction, obtaining additional information, monitoring, complementary expertise, etc. — without setting a work schedule, which the standard excludes from the mandate. An Include a deadline phrase toggle lets you automatically add the contractual mention “before the inspection contingency deadline of the purchase agreement”.
A note at the bottom of the modal reminds you: “This structure covers the content required by chapter 8 of the BNQ 3009-500 standard.”
Generate with AI

A Generate with AI button lets you automatically write the content of the four parts from a short description. You write the essentials of the observation, and AI structures the narrative in the BNQ format. Validate and adjust as you wish before publishing. See Ask AI from the editor.
Display options
A Use sections in the report checkbox controls whether the subheadings (Identification, Role / Function, Consequences, Recommendation) appear in the final report, or whether paragraphs follow each other without intertitles.
Validate
The Add narrative button at the bottom of the modal adds the narrative to the subsection. You can then attach photos via drag-and-drop from the images panel (see The images side panel).
There is no limit on the number of photos per narrative in the web editor: attach as many as the observation calls for. On Lumos Capture, a single capture is still capped at 12 photos, but nothing stops you from adding more to the narrative from the gallery once back in the editor.
Add to the template
To the right of Save to Bank, the Add to template button puts the narrative in this subsection’s pre-shown list in your template. It is the shortcut for growing your template inspection after inspection, without opening the builder.
- If the narrative is not in your bank yet, Lumos first asks for its title (and what to do with the attached photos), saves it to the bank, then adds it to the template — one click.
- If the narrative already comes from the bank (yours or a Lumos pre-written one), it is added directly.
- The button does not appear when the narrative is already in this subsection’s list. On a cloned subsection, the addition goes to the original subsection.
The current inspection does not change. Each inspection works on a frozen copy of the template taken when it was created; the added narrative shows up in the pre-shown list of your next inspections created with this template. If you want it in the current inspection, simply add it to the subsection like any bank narrative. Do not use Reset the template for this: a reset wipes every narrative, capture and answer of the inspection.
After the first addition, a window reminds you of this; tick Don’t show this message again to make later additions silent (the button then reads In the template).
Lumos BNQ template. The system template provided by Lumos is shared by every inspector and cannot be edited. If your inspection uses it, the button suggests duplicating it (Settings → Templates): your copy is yours, you can add your narratives to it and use it for your next inspections. See Create and manage your templates.
Collaborators of a shared template (edit rights) can also add narratives to it from the editor.
Edit an existing narrative
Click a narrative in the subsection to reopen the modal and edit the four parts, the title, the type, the severity, or the attached photos.
Delete a narrative
The delete button on the narrative card removes it from your inspection. The operation does not affect the bank (the pre-formulated narrative stays available for future inspections).
See also
- The narrative bank — overview — where pre-formulated narratives come from
- The four narrative types
- Create a custom narrative — to add your narrative to your bank
- To Review — turn a capture into a narrative
- The photo gallery
- Ask AI from the editor